
Our master bath vanity mirror is one of those large, generic, 1980’s looking pieces of sheet glass:

Hubby has voiced a few times that it would be nice to replace it with a smaller framed mirror, or a couple of mirrors. I love the big size and brightness of the original mirror so I decided to DIY a frame for it.
In early July I headed to Home Depot. I knew what general style I was going for, so I perused their molding & trim aisle at 7am on a Sunday [my favorite time to go]. I was planning to buy actual wood molding, but a style of fake wood molding caught my eye. It was the perfect size and shape [and was pre-primed], so I bought a few strips. I measured [what I thought was carefully – more on that in Part 2] and used my miter saw to cut the pieces for the frame:


You may notice a piece of cardboard in those pictures. I had read online that you can alleviate the headache of matching up molding corners by placing a wedge of cardboard under each board as you cut it, which will slightly angle the cuts on the back side, making them line up easier. However, after telling Abbie what I’d done [thinking I was so clever] she said “you only need to do that for molding that’s going to be up against a wall/ceiling. For flat pieces like a mirror frame you don’t need to angle the back”. D’oh! Oh well, now I know for the future, if I ever install the molding I bought for our front hall 4 [!] years ago…
I made sure the pieces were square:


Then stapled the backs of each corner and also glued them. I set heavy things on each corner to make sure the completed frame dried flat:


The following day I started painting it with the same bright green high gloss paint I used on the living room cupboard [Benjamin Moore Rosemary Green]:


Hubby had suggested bright red, like the girl cave bookcase, which also would have looked awesome. But I had my heart set on green. It took about 4 coats before I had full coverage:

2 weeks later I started applying coats of polycrylic sealant over the green paint. I sealed the front and back with about 4 coats. Fake wood tends to swell and get nasty when wet, and because we’re using this frame in a bathroom, I wanted to be super sure it was sealed tight:


I kept having to flip the frame over after each coat of polycrylic to mop up the drips before it dried:

All done – nice & shiny:


It wasn’t until I held the frame up to the mirror that I realized I’d need to paint the back – d’oh! So I applied 2 coats of paint & 2 more coats of polycrylic to the back. Now when you see the back reflected in the mirror at least it’s painted [not very well]:

I spent about 3 weeks researching the best way to attach a frame to a mirror. It’s actually quite a tricky prospect! At first I thought of using hot glue, but decided the glue would cool down too much by the time I got it all the way around the frame and then got the frame onto the mirror. I thought of all different kinds of glues and caulks and sealants. And hooks. And Velcro. I almost went with Velcro – it would be nice to have the option of removing the frame, but I decided it would be way too bulky. I finally settled on Liquid Nails [which you apply with a caulk gun].
In mid-August I was ready to hang the frame. I had purposefully made the frame wider than the mirror by the width of the frame, to better balance it with our vanity. So before gluing the frame to the mirror I had to make the wall on the right side flush with the mirror edge, about a ½”. 2 paint sticks were the perfect width so I glued them to each other, then to the wall:

Then used the Liquid Nails to apply glops of caulk to the back of the frame. Thanks to my internet research I knew I’d need to tape the frame in place at first, to give the Nails time to set. I also spent about 20 minutes pressing on all corners and parts of the frame, to make sure it was stuck to the mirror thoroughly. I also read that once the Nails started to firm up I’d need to support it for 24 hours so it wouldn’t slide down the mirror [because gravity]:


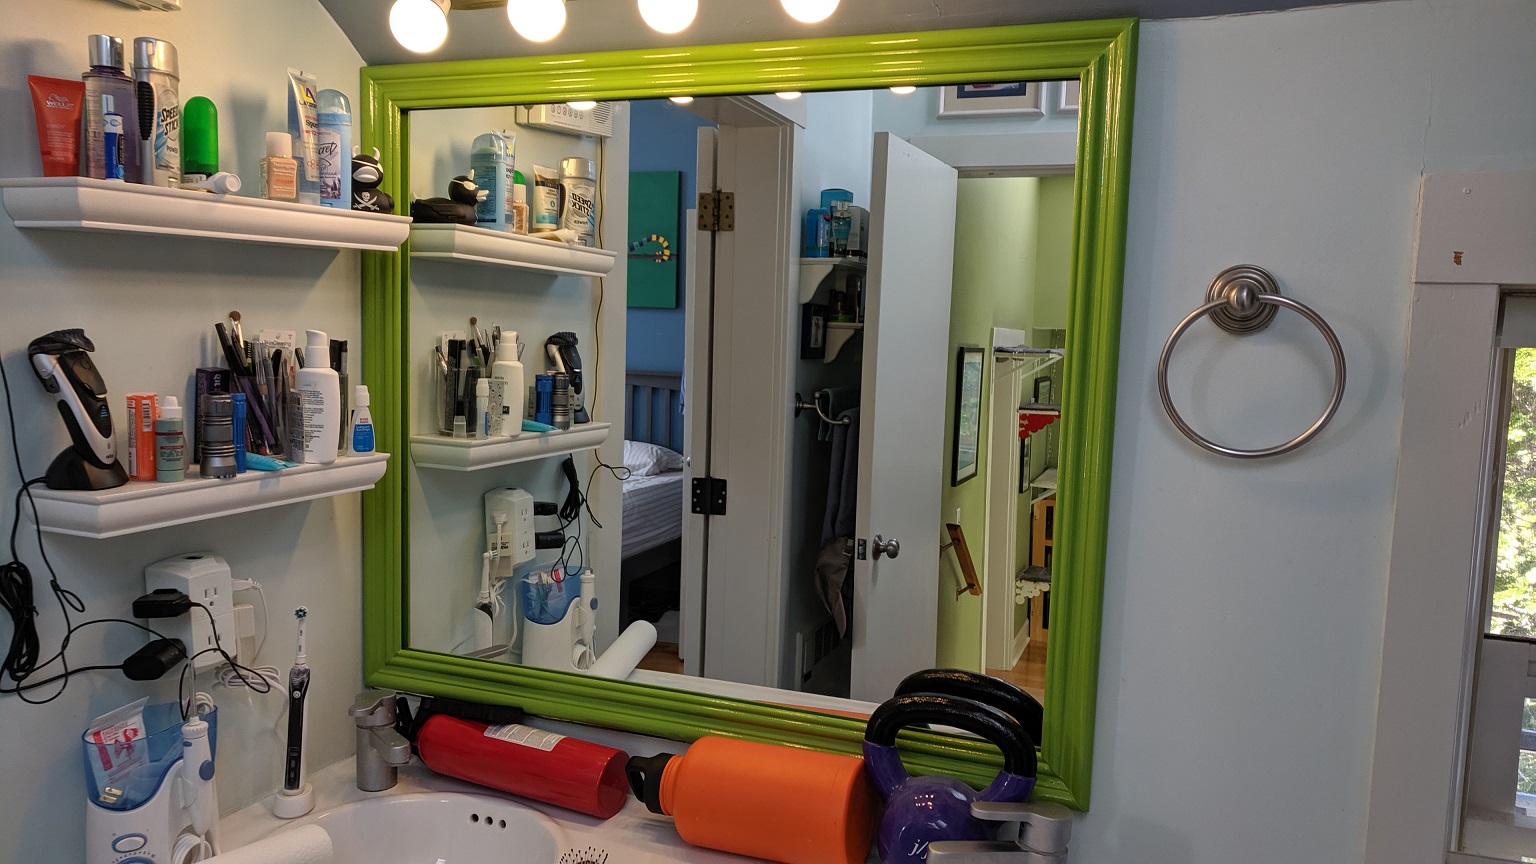
I actually forgot about that step at first! I removed the tape after about 20 minutes, then went downstairs. About 30 minutes later I remembered the whole gravity issue and ran back up. The right side of the frame had slid down about an inch… I was thankfully able to gently push it back up [Liquid Nails takes about 24 hours to totally cure]. I placed a fire extinguisher, a large metal water bottle, and a kettle bell underneath it. Those did the trick and the mirror hasn’t budged since.
Here’s a shot of the paint sticks behind the mirror – you can only see them if you press your face to the wall:

Stay tuned for Part 2 where I caulk every conceivable gap and reveal my dumbass measuring error!