
Back in 2015 I first posted about the cracks in the master bedroom where the ceiling meets the accent wall:

It’s the same issue I fixed in the girl cave in 2013 – my VERY FIRST DIY home improvement project 🙂
One of the items on my 2018 Projects List is to finally repair the bedroom crack, which runs almost the length of the wall. Now that we have our new king bedframe, and now that I’m finally done with the chameleon mural, it’s time to address the bedroom wall.
Yesterday I took the afternoon off from work to have lunch with my parents and then to do errands. However, I ditched the errands and headed straight home instead. Once I got home I decided on a total whim to start work on the bedroom wall. I was planning to start this weekend, but why not get a jump on it right?
STEP 1: Drag new bedframe away from wall. First I moved the chest away from the foot of the bed, then I dragged the underbed drawers into the girl cave, then I used hubby’s idea of “just drag the rug and the bed will come with it” – brilliant! It would have been easier with 2 people, but I managed:

STEP 2: Cover hubby’s closet, my clothes chest, and my bookcase with plastic:


STEP 3: Paint a test splotch of Benjamin Moore Caribbean Teal, which I’ve had on hand for years. I was so convinced it would be perfect for this wall:


Um… not so much… I love it in theory, but on the wall it just looks muddy and wrong. BLEH. I’ll have to find something else in the house to use it on, because I do love it as a color!
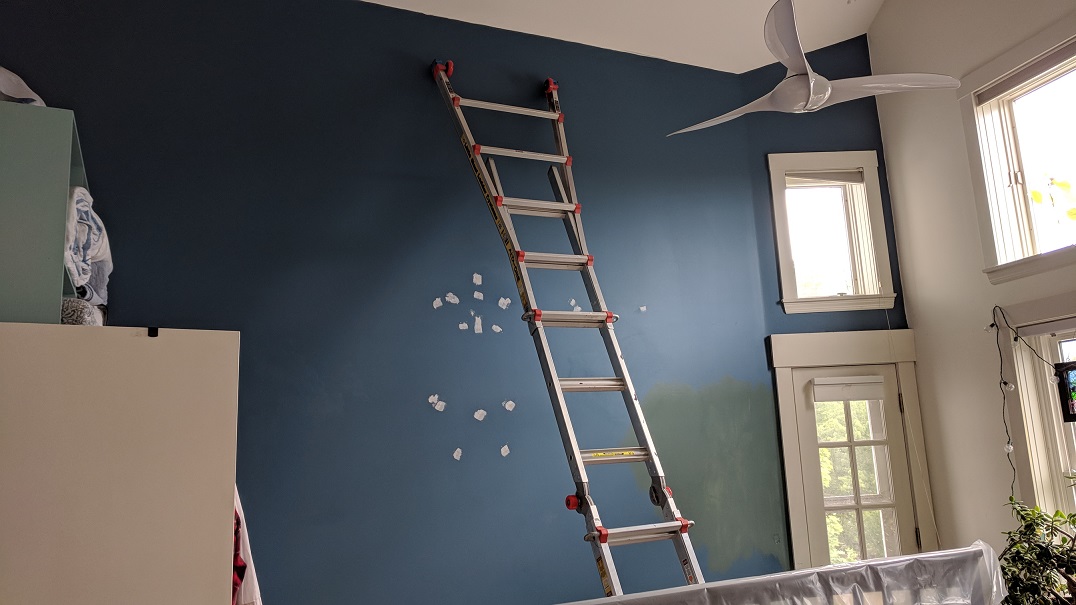
STEP 4: Grab my ladder and set it up straight against the wall so I could reach the ceiling:


As you can see in the 2nd pic I also spackled a bazillion nail holes in the wall.
STEP 5: Fix the REALLY bad patch job I did on the wall when I was trying to find the deck outlet last year [the following 2 pics are from last year]:


CLOSEUP OF THE “FULLY REPAIRED” REALLY BAD PATCH JOB FROM 2017:

So yesterday I started by trying to use my shop-vac attachment which simultaneously sands the drywall and sucks up the dust, but it wasn’t working [well, it probably was, but it would have taken an hour and I have no patience]. So I used really rough-grain sandpaper and after a few minutes I ended up sanding the cross-hatch FibaTape right off LOL!!! Made my job easier. There was still FibaTape where it counted…:


…so I just spread a light layer of joint compound over it:

STEP 6: Climb the ladder and assess the drywall crack damage up close:


Pick the best tool for the job [I’m not sure if this is a grout tool or a chisel…] and scrape scrape SCRAPE off globs of thick paint and a few small chunks of drywall and/or sheet rock:

Move ladder over a few feet at a time and continue until whole crack is scraped. Then use rough grit sandpaper and smooth things out:


It took about 40 minutes to do the whole crack:


Then climb up and down ladder a mazillion times with a wet sponge and thoroughly clean off all drywall dust. MEH!!! That was the worst part by far.
STEP 7: Shop-vac up all the scrapings and dust before hubby gets home from work:

The whole 3 hours I was working in the bedroom both cats were hell bent on getting behind the plastic sheeting I’d hung up. They sort of succeeded… They also investigated the room and inspected all the changes I’d made to the furniture placement. And every time I moved the ladder or used the shop-vac they’d bolt out of the room. It was entertaining.
Today after work I lightly sanded the drywall patch:
Next up will be applying drywall tape up at the ceiling [smooth this time, not cross hatched] and then joint compound. And we still need to pick a paint color.
I agree with you about Benjamin Moore paint.
😎
Reading this made me sweat (it’s hot here)! Glad you mentioned the Hyde sander thingy, because I need to get something like that for my plaster repair project that I’ve been putting off for two years (ahem). I tried a color similar to that in my bedroom and had the same reaction. Good luck with the patching!
I was wondering how your plaster project was coming! Is the living room done or is that what you’re referring to? I can’t remember now! You’ve done amazing things in there so far. It was hot here too, and very humid. I took a few breaks, but the AC helped keep things cool enough.