
My last post about basement flooding was in June 2018. The only basement wall still in need of waterproofing was the long wall in Kathy’s cage, which borders the River. I tried to patch it in March 2018 when it was actively leaking [and looked like little boys peeing]:


But it didn’t work. The cement says it will work on active leaks, but it didn’t for me!
So THIS March I finally got back to it. Kathy moved out in January [thankfully just up the street!], and the new tenant doesn’t move in until May, so it’s the perfect time to take advantage of an empty cage. The long wall, left, center, right [I wish I’d thought to do a panoramic shot]:


As before, the first step to waterproofing a basement wall with hydraulic cement is mask and eye protection:

Then shop-vac’ing the wall, and following up with a scrubber brush:


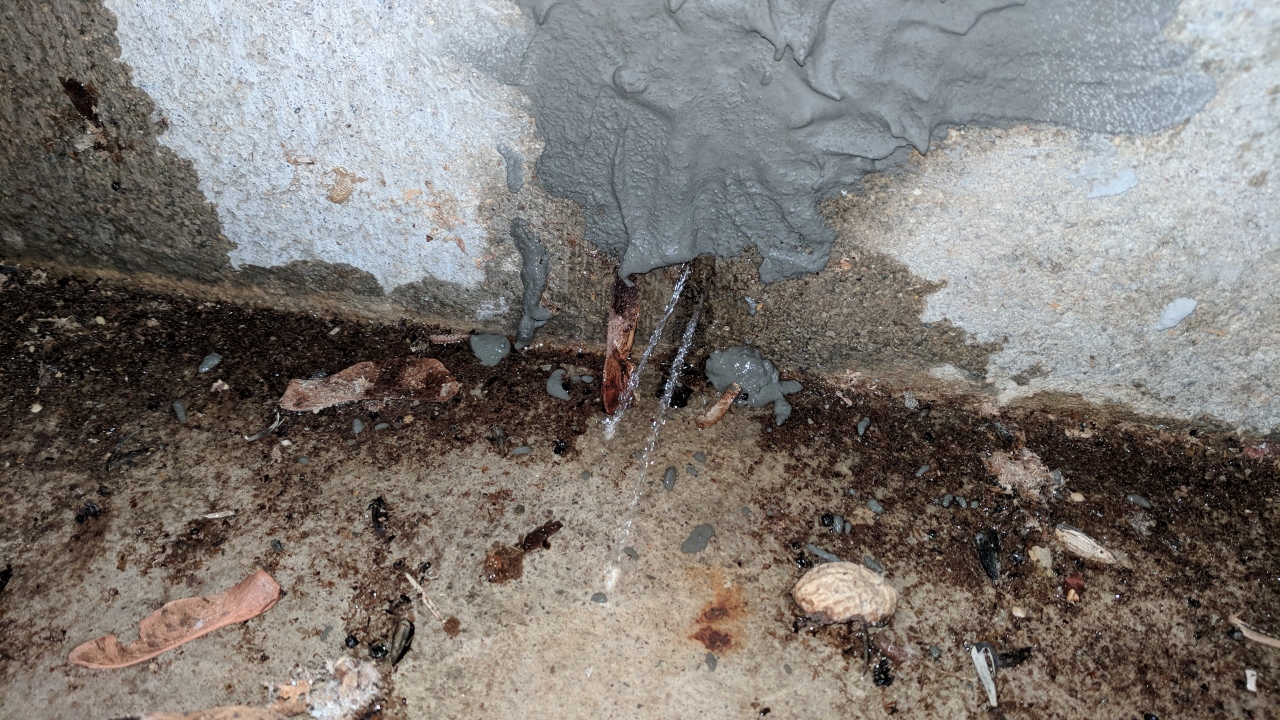
Mix up the Drylok cement as instructed:


Spritz the wall with water:

And glop the cement onto the areas that leak during flooding:


It is supposed to dry for 24 hours before painting over it with Drylok masonry waterproofer paint:

The next morning, before starting on the wall, I decided to Shop-vac the hell out of the basement. Like everywhere. Behind stuff that hasn’t been moved in years, behind the water heaters and furnace, under stuff, all the horrible cobwebs that line the ceiling. All gone:


I’m an awesome condo manager 😀
Then gathered my supplies to seal the long wall. I had a new gallon of white all set to go, but realized I still had 1/3 gallon of grey. Since the wall at the far left of the cage was all stained & ugly, I decided to use the grey to make it prettier:


I even got in behind the sump pipes:


After about an hour, much better! And even better after a 2nd coat [right]:


After all the shop-vac’ing, and painting the small wall with grey, I had just enough energy left to start on the long wall. I knew from using a foam roller on the small wall that getting between each cement block sucked, so I decided I’d use a brush to edge the long wall. The new gallon of white had been sitting for about 2 years, and the paint was NOT mixing with a stir stick, so I used my drill-bit stirrer which did the trick:


Then edged:


A few days later I used a roller to paint over the wall. It was slow going. I hate roller-ing paint. I’m a brush girl:


After one coat, I let it sit overnight. Then started a 2nd coat, using my brush this time. My camera made a nice panoramic shot for me:

The paint brush really did a great job of coating the wall. Such a difference between one roller’d coat and the 2nd brush coat:

Here is is today – looks great!:

I won’t know if my latest round of waterproofing cement and sealant worked until the next time the River floods. Hopefully I’ll be waiting a long time!
Here’s the small wall today. Some of the white staining has come through the paint, but I mostly painted this wall to use up the grey sealant paint and make the wall prettier, so I’m not worried:

I’m hoping my 8th round of basement waterproofing is the final round!!!
Wow, your basement looks great! Eric has used something like that sealer compound on our basement floor, which has cracks that leak water in winter. It helped a lot! Have you thought about investing in a paint sprayer?
I totally need a paint sprayer! The only thing holding me back is they always sound so awful to clean after using them. But I should really get one. I know you have done wondrous things with yours!
Haha — I’ve never used it. That’s Eric’s toy! 🙂
Fingers crossed for you. Flooding is never a good thing.
Nope. It’s only a real problem when the power goes out, taking the sump pumps with it. As long as the sumps are working, the incoming water is manageable. But still annoying. After all the waterproofing I’ve done [and making sure the gutters point away from the foundation] we’ve had the driest basement in probably decades. I like to keep it that way!
omg Alison! I’m exhausted just reading your post. Your energy and perseverance amaze me, but what a feeling of satisfaction you must have knowing you REALLY cleaned the entire basement. How old is your house? That’s a lot of years worth of cobwebs, dirt and heaven knows what!
Great job! The basement looks amazing!
The house is 1716, but our condo was added in probably 1970’s-1980’s. I keep meaning to go to Town Hall and find the official records. The basement is pretty old! There’s 300 year old termite damage on some of the huge support beams that hold up the house. I think the beams were like that when they put them in. At least that’s what the house inspector told Jim. That the termites nibbled on the wood before it was cut for beams. Definitely a LOT of dust and grime down there! Well, not so much anymore 🙂