
This post covers the replacing of 9 doorknobs, 0 deadbolts, & 18 hinges.
For a long time I’ve wanted to replace our ugly, old, stained [and sometimes painted] brass hinges and ugly gold doorknobs with silver. I’ve never been a yellow gold person. Or brass. I finally started this project the first week of September before my trip to Germany. I started with doorknobs. I went to Home Depot and bought 10 sets of doorknobs. I went with their cheap Defiant brand Satin Nickel Bed/Bath Privacy knobs for $12/each. I also bought 30 hinges for those 10 doors. I went with their Everbilt 4″ Satin Nickle for $3.50/each. I like cheap. Especially when you’re talking that many doorknobs and hinges nods.
SIDENOTE: cheap ended up biting me in the ass. More on that in PART 3.
I started with the master bath/hallway doorknob [#1/14]. Old knob style on left, new on right:


I also changed out the ugly gold master bath/bedroom doorknob [#2/14] & master bedroom doorknob [#3/14]:


Ugly gold girl cave doorknob [#4/14] & laundry room inner door doorknob [#5/14]:


And ugly gold downstairs bath doorknob [#6/14] & and front hall inner doorknob [#7/14]:


We have 2 French doors in the living room which required smaller hinges [3″ instead of 4″] and “dummy” doorknobs. The old hinges were painted white and starting to tarnish [I believe I’m the one who painted them… ooops]. The new satin nickel ones are MUCH better [hinges #1-6/42]:


The old dummy doorknobs were gold colored ovals, I replaced them with satin nickle round [you can see both doorknobs side by side in the 2nd pic] [doorknobs #8-9/14]:

Much better:


Then I moved on to the front door [hinges #7-9/42]. The hinges were abysmal. All rusted and stained:


For all my hinge replacements, I opted for the method of removing the top hinge & replacing it with a new hinge; removing the middle hinge & replacing it with a new hinge; removing the bottom hinge & replacing it with a new hinge. That way I didn’t have to take any of our psychotically heavy doors off the wall and risk f’ing up their placement.
As I removed the front door hinges I realized the edges of the old hinges were very rounded [5/8” radius], whereas the edges of the new ones were very square [¼” radius], so I had to chisel out the corners to make the new hinges fit:


I’m not the best chiseler, but this was my first real attempt, so not terrible:


The new hinges fit perfectly and look much better:

Because our front door doorknob is set to open with our house keys, I didn’t want to change it. So instead I opted to spray paint the front doorknob and deadbolt with Rustoleum Metallic in as close a match as I could find to satin nickel [all the photos in this post up through the 2 of Darwin were taken 9/2/18, which is why it still looks like summer]:


I prefer the silver color much better:

Meanwhile Darwin was assisting me, out on his leash and harness. He set up shop on our neighbor Kathy’s front porch, using her colorful rug as his base:


Up next was changing the hinges on our inner front hall door [hinges #10-12/42], which is mostly glass. After replacing all 3 hinges I noticed the gap between the door and door jamb was about 1″ wide at the top and middle hinge, but only ¾” wide at the bottom hinge… It struck me odd, because I had followed the same footprint of the old hinges, so I figured that must be how it was originally done. But why…? The door closed fine, so I didn’t fiddle with it, but it bugged me.
Then I went to Germany, and didn’t work on doorknobs or hinges until this past weekend. For that entire time [9/2 to 11/11] the smaller gap at the bottom of the inner front hall door bugged me. My inner voice kept saying “just LEAVE it – the door works fine” but my OCD voice said “you HAVE TO FIX IT before you can move on!”. That stupid dilemma has been the reason I haven’t done doorknobs & hinges for over 2 months. I FINALLY decided to fix it on Sunday. I started by unscrewing the hinge from the door, but not the jamb:

Then re-positioned the hinge to where it should be and traced new drill holes. However, of course, you can’t drill new holes that overlap old holes. So I did some YouTube sleuthing and found a video from a guy showing a way to solve that with matchsticks and wood glue. You cut matchsticks down into little lengths comparable to the screws, then hammer them into the old holes with some wood glue:


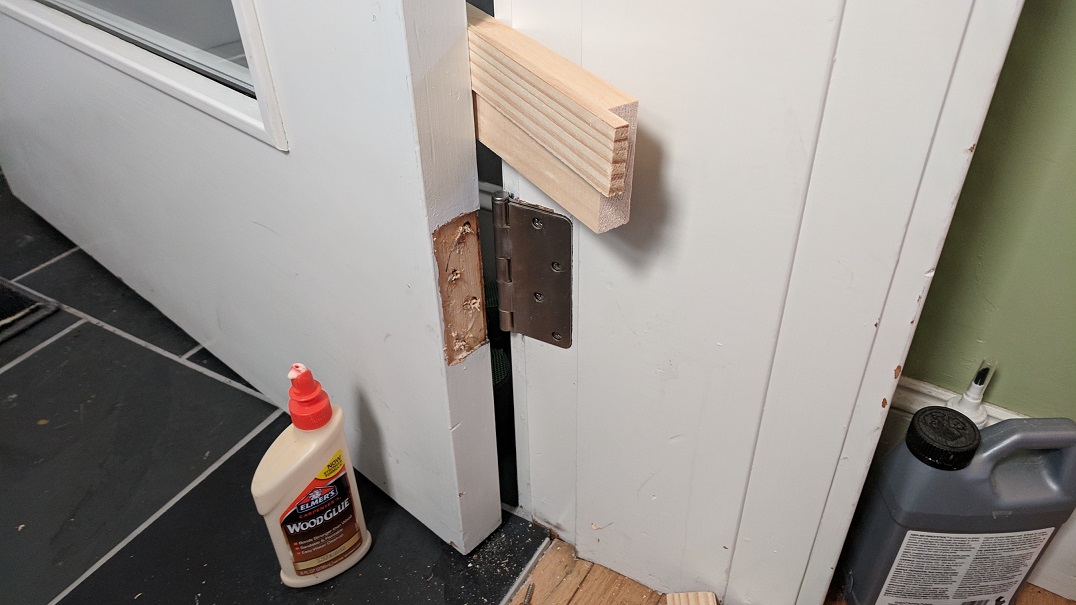
In the 2nd pic above, 2 sets of matchsticks have been hammered in, and 2 sets were waiting to be hammered in. After that, I was easily able to screw new holes for the new hinge placement. I used a piece of wood and a shim to make sure the door was being held the right length from the jamb, then screwed the hinge back on:


But when I tried to close the door, I realized why the hinge placement had been “off”. The f’ing door wouldn’t shut at the bottom. It was hitting the jamb. I’m not sure if it’s because the door got warped over the years, or whoever initially installed it got lazy and took the easy way out by fiddling with hinge placement, but I had to spend an hour shaving down the door with a little planing tool I think my dad gave me, then sanding it, priming it, and painting it:


What a PAIN IN THE BUTT! But at least that door was done, and closes PERFECTLY now.
I could finally move on to replacing the hinges on the downstairs bathroom door [hinges #13-15/42] and laundry room door [hinges #16-18/42]. PHEW! I still have to replace the hinges upstairs and on our 3 other outer doors [laundry room, bedroom to deck, and living room to back yard]. And have to install doorknobs on those outer doors.
Yikes! What a lot of work! The end product makes all that work worth it, and, like all DIY people, you sometimes have to learn as you go!
Yes, DIY always seems to be “learn as you go”. And nothing works out the first time. But that keeps it interesting 🙂
At least you are persistent! I like the new nickel knobs. Good job!
Thanks, D’Arcy!