
Now that the cat enclosure is built, and our replacement windows are installed, I’ve been focused on getting the connector built. The connector will attach to the house outside the dining room window and give the kitties easy access to their catio.
Last weekend I went to Home Depot and bought 6 2x2x6’s, cut them down to 5′, and stained them to match the catio:


I also bought 3 1x3x6’s for the floor of the connector, which I also cut to 5′ and stained [I only ended up needing 2].
My first attempt at putting together the frame involved using 3″ deck screws:


It came out OK, but wasn’t perfectly square:


Which bugged me. So after work Friday I went back to Home Depot to peruse their Simpson StrongTie connector section, and found these little brackets:

I didn’t know how many I’d need, so I bought 30 [turns out I used 29, so that was a damn fine estimate!]. I took apart the frame I’d built with deck screws and rebuilt it with brackets:


I am incapable of cutting wood in a straight line so the brackets REALLY helped pull my crazy wood together into a usable [and square!] frame:


Then I got to work building the connector top, which was identical to the bottom frame except for no floor boards. I placed both frames on top of each other to make sure they were the same size:


Damn near perfect – woohoo!!!!!!!!!!!!!
The entire time I was putting together the frames I was sitting on the living room floor sipping Mike’s Hard Mango Punch, and watching TV with hubby. By the time I stood up to start putting things away I was a little tipsy and stumbled backwards [I’m a total lightweight – it doesn’t take much]. I stomped one foot down on the pile of extra brackets and the other on my glasses. D’oh! Foot got cut and glasses got bent. Don’t drink and DIY:


Saturday morning I decided to proceed with a little side project involving the cat enclosure. I’ve never liked how the screws holding the luan slats over the staples look. Too shiny and bold:


So I took them out and replaced them with galvanized nails instead, for a much more subtle presentation:


I dipped a Q-tip in stain and dabbed it on the spots previously housing screws. I think it looks much better *nods*.
If you can believe it [I couldn’t!], for most of the entire hour I was banging nails into the cat enclosure this is what Bonkers was doing:


Bird watching and chillaxing! I was making SO MUCH NOISE. But he couldn’t have cared less. Amazing. Here’s how awesome I am at hammering. I call it my table of shame:

Yesterday afternoon/evening hubby and I went to a party to celebrate a friend’s wedding. In typical hubby fashion he made lots of faces when a friend offered to take a few pics of us:


Thankfully he behaved for the last one 🙂 There was also a beautiful rainbow over Gloucester Harbor:

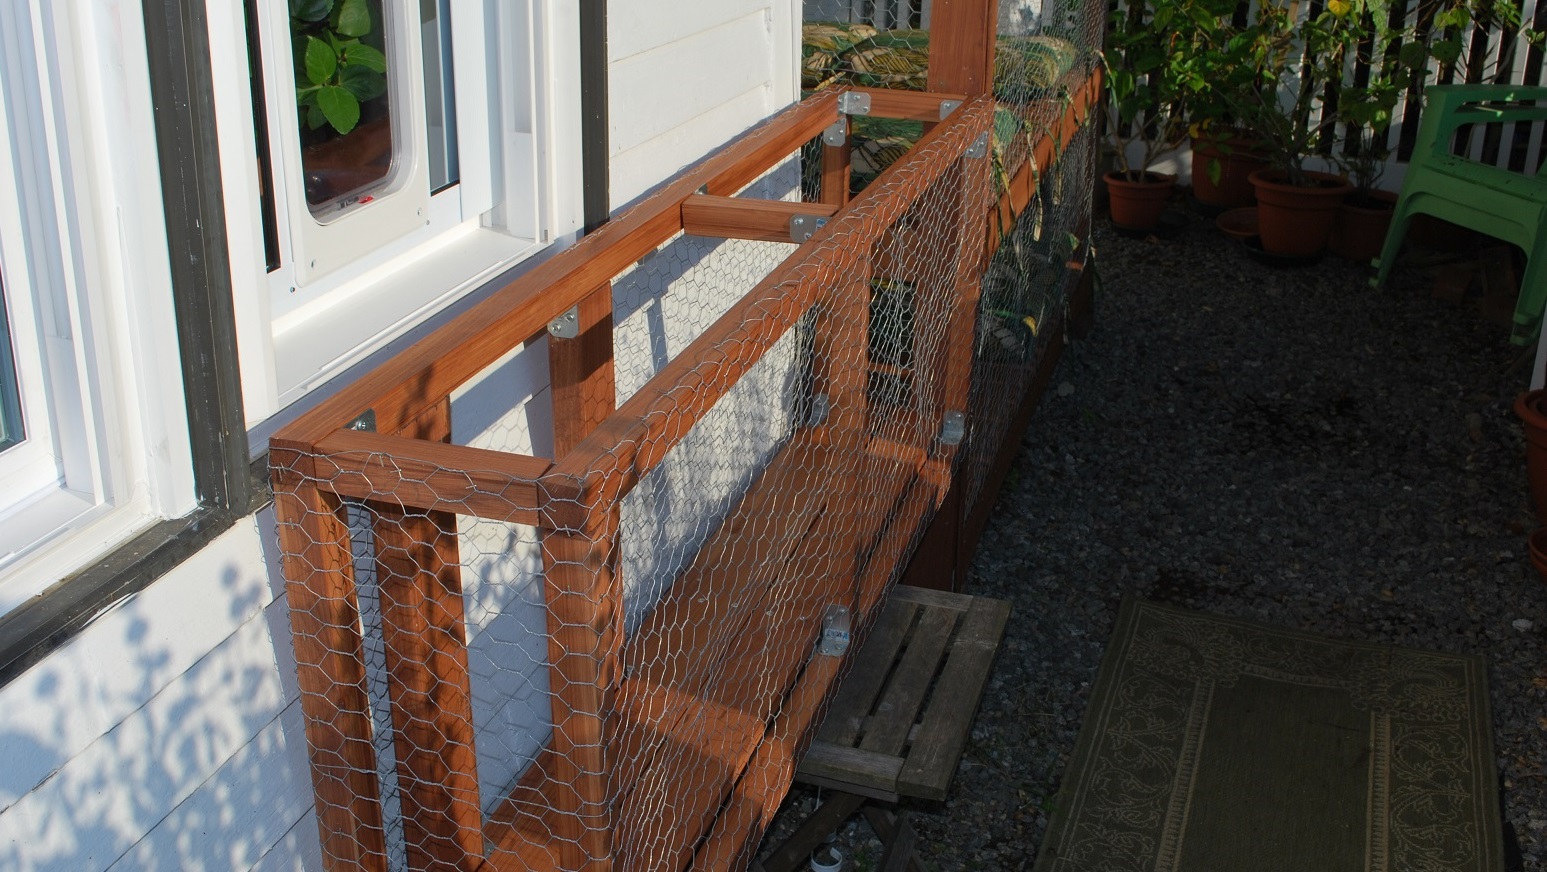
This morning Bonkers woke me up bright and early [yay…] so I got back to work on the connector. By noon I had it pretty much finished! I used 2×2’s to make the 5 support legs between the top and bottom frames, and used 2 2×4’s to frame the doorway which will align with the cat door in the dining room window:


The sides are all chicken wired except for the end where they’ll enter the catio, and the section between the 2×4’s. Here’s what it looks like outside!!! It’s propped up on a little table so it’s about 18″ below it’s final position:


You can see in the 2nd pic that the 2×4’s perfectly frame the cat door – woohoo! I’m not going to put the roof on until after it’s in it’s final position. The roof will be made of the same polycarbonate tiles the cat enclosure roof is made of. At the moment my plan is to build a 3rd frame using 2×4’s, with 6 legs, painted white, which the connector will sit on. Basically a custom table. I’ll use small brackets to anchor the connector to the house and table. I also need to cut the chicken wire on the cat enclosure where it will attach to the connector. I’m getting there!!!
Love the project, love the rainbow. Jo @ Let’s Face the Music
Nice job. You impress me worth the dotted with which this project is coming together. I like Mike’s hard sour cherry lemonade. I will try to remember not to drink it and diy.
Thanks, Jessica! I like the sour cherry one too 🙂
My cat Lacy would sit right at the door and block everyone else from using the connector!
Could you use some sturdy brackets to attach the connector to the house, and skip having to build the support table?
Ya, we’re waiting to see if either of the boys creates a road block for the other! I am still torn between a support table vs. connecting it to the house. there’s pros/cons for both. right now i’m leaning towards support table just so i can move the whole thing easily if i need to – it would also really help me in regards to attaching the connector to the catio. i need to pull the catio away from the wall of the house and it would be very helpful to have the connector sitting on something where it’s at the perfect height/angle for me to get all around it and connect it with brackets. we’ll see!
Incredible – so multi-layered and so amazing. Can’t wait to see the finished project – you’re SO close! And can’t wait to see how long it takes ‘the boys’ to figure out how the cat door works!
Great pictures of the two of you on the boat last night. Such fun!
Thanks, Mom! I can’t wait until it’s DONE!
What a great job. It looks fabulous…Dad
Thanks, Dad!
Great job! What an amazing project. And love the pictures of you and Jim!
Thanks, Aunt Susan!