
In case you missed it, here are the previous links for this now-completed project:
DONE! Finally done. This project took way longer than I expected and was full of harassing little mishaps, but it’s DONE.
I started on July 26th by [re]patching the wall and scraping the ceiling crack:


On July 28th I used drywall tape & mud to repair the ceiling crack, and started painting the lower half of the wall:


On July 29th I sanded the crack, painted the rest of the wall, and almost ripped the fan off the ceiling by getting my ladder stuck in it:


On July 31st I fixed the fan and went through 9 colors of white before finding a match for the ceiling:


And on August 1st I shared a pic on Instagram and realized the upper portion of the wall paint was very splotchy:

GAH!!!
After a short break I resumed work on August 11th. I moved the bed away from the wall AGAIN, set up my ladder AGAIN, taped the ceiling and repainted the upper part of the wall with 2 more coats:


As I removed the tape most of my new ceiling paint [which was actually just primer, so I guess I shouldn’t have been so surprised] came off with it, leaving big, nasty defects:


*BANGS HEAD ON FLOOR*
So I decided I needed REAL ceiling paint. I went to Home Depot and brought the can of Behr primer with me, since it was an exact match to the ceiling color. The man at the paint counter sold me Behr ceiling white. I was so scared it wouldn’t be an exact match but it was! Not just a mostly-match, but a 100% match to our existing ceiling paint!!! I know this because I painted a big swath of it on the lower part of our ceiling [which I can reach when standing on the floor] and can’t see any hint of where the new paint is versus the old:


On August 20th I moved the bed AGAIN, climbed the ladder AGAIN, taped the WALL this time, and added 2 coats of ceiling white:


And as I gently pulled off the tape…:


ARE YOU F’ING KIDDING ME??????????????
So I had to lug the gallon of wall paint back up from the basement and carefully touch it up. I used an art brush instead of a paint brush so I could be sure to not get any on the ceiling. Thankfully, finally, it was DONE. The wall is still a tiny bit splotchy up near the ceiling, but I don’t care. From most angles, the wall and ceiling look magnificent:


Then it was time to re-hang the chameleon mural. First I sprayed it with Krylon Archival UV spray. It does all kinds of great things for art:


I sprayed it outside, since it’s quite smelly:


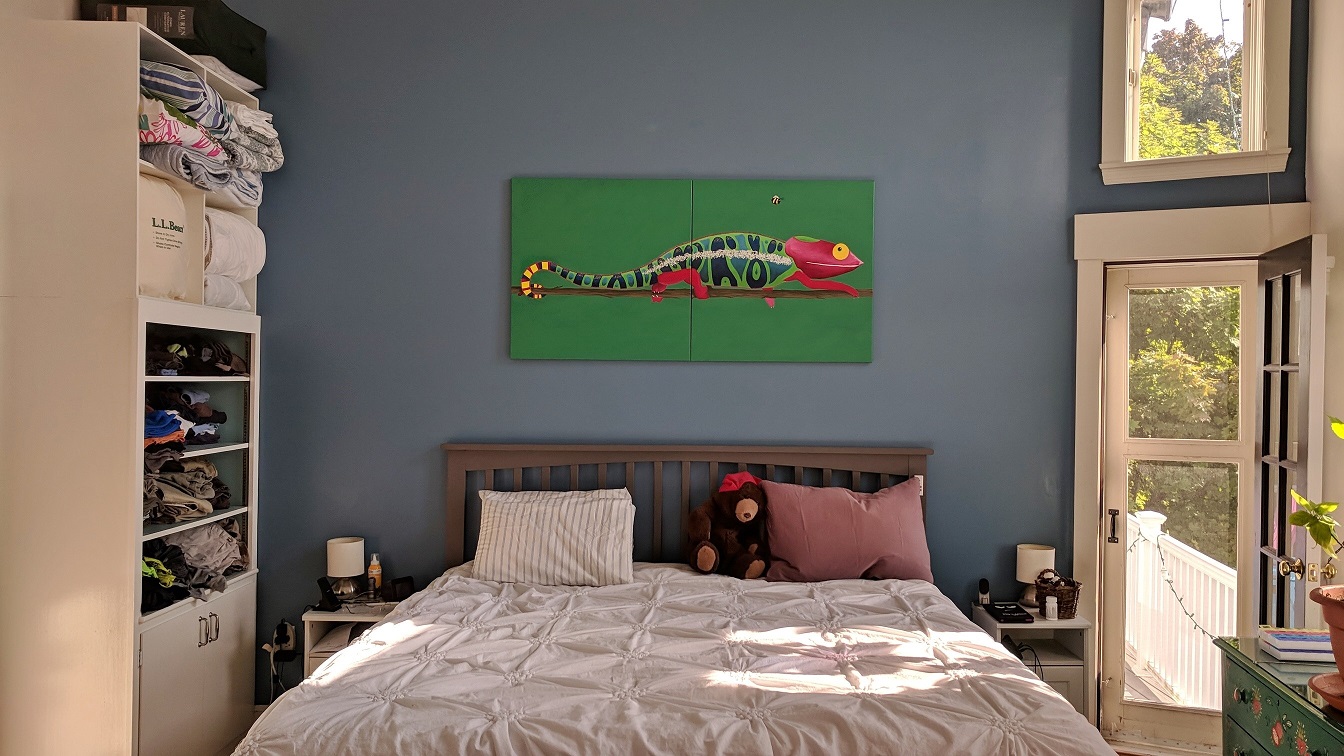
After letting it dry for a few days, I hung it on August 26th. I decided it would be easier to hang if it was one canvas, so I carefully laid it on the bedroom floor and staple gunned it together:


In order to reach the wall high enough to drill anchor holes, I had to precariously perch on my step stool. Birdie was NOT amused:

But it looks WONDERFUL [I still can’t believe I painted it!]:

It’s so nice to have the wall, the ceiling, the mural, and the new bed all making our bedroom look beautiful:


Comfy and cosy.
Gemütlich und kuschelig,
Liebe Grüsse
see you in 4 days, meine Schwester!!!
ABSOLUTELY FABULOUS! Makes me proud, love Dad❤️
Thanks, Dad!!!
And that is why I don’t use painters tape. It is faster to just cut in, and you don’t have to worry about peeling paint off. Congratulations on a beautiful wall in the end. You did a great job.
Thanks!!! No matter how hard I try I always get paint EVERY WHERE without tape… Like, I seriously tried to do the ceiling without putting tape on the wall and vice versa until I gave up.
OMG–the tape!! Is that Frog Tape? I’ve never had that much trouble, but I prefer 3M. I’ve used Frog before and had the opposite problem: It didn’t want to stick! The wall and ceiling look beautiful now, though! Nice job!
I’ve never had ANY problems with frog tape before! It’s always had my back! It’s just something about this project. I will keep 3M in mind. They make great stuff.
Your bedroom is spectacular. Love the blue paint, love the high ceilings, and ‘the view’ … and the frosting on the cake is the chameleon mural. Great job!
Thanks! Glad everyone got to see it this past week 🙂