
The last time I worked on this project was last AUGUST – OMG. Here’s what the chameleon looked like then:

I have been working on it on and off since then! Here is a progress report:
I decided I didn’t like the eye, so I painted it solid grey so I could start over. I also added some little yellow dots along the chameleon’s back and tail:


I sat on a stool and stared at the chameleon for 20 minutes. I needed a fresh perspective. I decided I liked having yellow on the head, but not how I had done it. I decided the head should be primarily red, and the eye should be yellow. I repainted the head in reds and added a base coat of yellow to the eye:

Then I added little spikes along the chameleons’ back, some deeper red to the chin, and more yellow to the eye:


Birdie did NOT approve. She said “Mommy. It looks a LITTLE demonic now. And by little I mean a LOT”:

She was right of course.
I evened out the chin’s skin tones and gave more detail to the eye and mouth. MUCH better:

After a long break, I was finally ready to try adding the whitish/bluish line down the center of the chameleon’s side. As you can see in the photos I based the chameleon on, it’s quite prominent:


During the winter Abbie had given me some blue eggs from her Easter Egg hen. I decided it would be cool to crush the shells up and use them to create the blue/white line. I lay the chameleon on the floor and sprinkled the egg shells along his back as a test run:


It looked really cool! I had been debating for months the best way to attach them. I’ve attached different things to paintings in the past, always using a dot of Super Glue and tweezers to stick the item onto the glue. But that was easy because there were only a few things to add. That method would have taken way too long with this project. I decided to start with spray glue, something I’ve never used before. I was so nervous! If I messed it up, I’d be screwed. I gently shook the eggshell pieces off the canvas’ and back into the dish, then covered most of the chameleon with upside-down puppy pads [which we use for Birdie since she doesn’t like to pee in the box]:


I sprayed the hell out of the canvas and then sprinkled eggshells on. When I stood the canvas’ up, a lot of the shells fell off. Gah! So I did it again and more shells stuck, but most still fell off. I lay the puppy pads back on, and this time sprayed both under and on top of the shells. More stayed on, but not enough. Unfortunately the spray glue left unsightly lines on the canvas 🙁 It’s hard to see them, but there’s 2 distinct lines under the line of eggshells:

The spray glue wasn’t cutting it. I started hunting for my Super Glue. Couldn’t find it. So I drove up to the hardware store and bought 2 kinds. I drizzled some on [the Elmer’s gel didn’t work at all, but I squeezed the entire tube of Super Glue on [sorry, Krazy Glue – just noticed it’s Krazy in the picture, not Super]], then sprinkled MORE eggshells on:


The Krazy glue worked really well but I didn’t have enough so I ran down to my basement workshop and grabbed the Elmer’s white glue because I remembered it dries clear:


Now we’re talking!!!:


Woohoo! I love how it came out:

My friend Christyne came over to watch Shadowhunters last week and I showed her my progress. She said “is that kitty litter on his side?” – D’OH!!! I guess it kind of looks like that from afar…
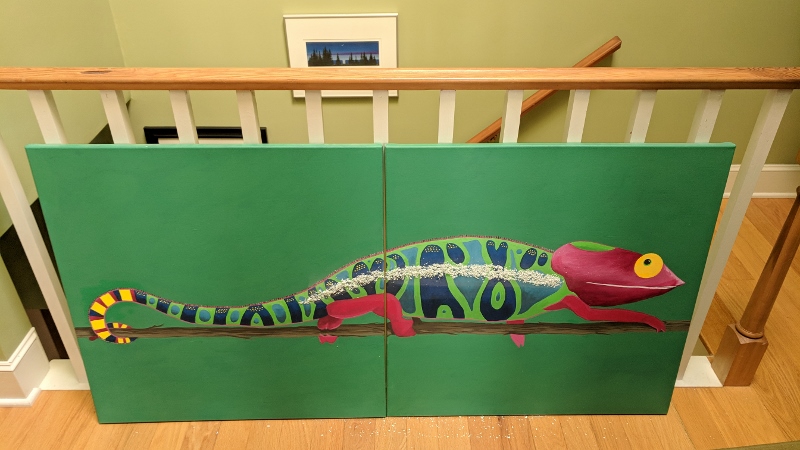
Today I spent a couple hours touching up the paint below the line of eggshells so you can’t see the spray glue lines anymore. All that’s left is finishing the feet!

Wonderful,i think it is complete.
Liebe Grüsse
Me too. I will hang it up tonight!
It’s beautiful; it’s spectacular. You can’t improve on perfection – time to finish it up and hang it on the wall!
Thanks! Hopefully today I’ll be done 🙂
It’s interesting to see how the chameleon’s changed as you try new things. I think the eggshells are a great idea. I bet in person they add some great texture. Such a unique idea!
Thanks! I’ve always loved adding things to paintings. I’ve never tried eggshells before. I like them!