
Why is everything so much harder than you think it will be?
At the end of Day 3 I was making really good progress and then this happened:

That’s the base of our ceiling fan dislodged from the ceiling. The fan was on HIGH and I walked straight into it with my 40 pound ladder. Needless to say it was like jamming a 2×4 into someone’s bicycle wheel – the fan went from high to zero in half a second and nearly ripped off the ceiling. D’oh! I was so scared I’d broken it. Or ripped the wiring apart. Or destroyed something important in the electrical box. That would mean buying a new fan, reinstalling it, and going through the hell of trying to program the remote control.
After investigating it Monday night I realized the wiring was fine [phew] and the electrical box was fine [phew] but I had knocked out a crucial screw [photo from 2014 on left, photo from Monday night on right]:


THANK GOD FOR OLD PHOTOS! It would have taken me a lot longer to diagnose the problem if it wasn’t for the comparison ability. According to the fan’s manual I needed to buy a #8x¾” machine screw. Tuesday afternoon I had to leave work at noon for a doctor’s appointment, and decided to take the rest of the day off. My doctor’s office is right near a Home Depot so I stopped on the way home & found the screws I needed:

Hooray! Once home, I climbed up the ladder and after much wrangling and swearing I got the screw in enough to clamp the base back to the ceiling:

I must have warped some things when I hit it with the ladder because even now it’s not completely flush with the ceiling [on the far side]. But it’s close enough, and it WORKS and that’s all I care about! Here it is happily spinning on medium speed. Although after testing it, I turned it back off, at least until the ladder is put away:

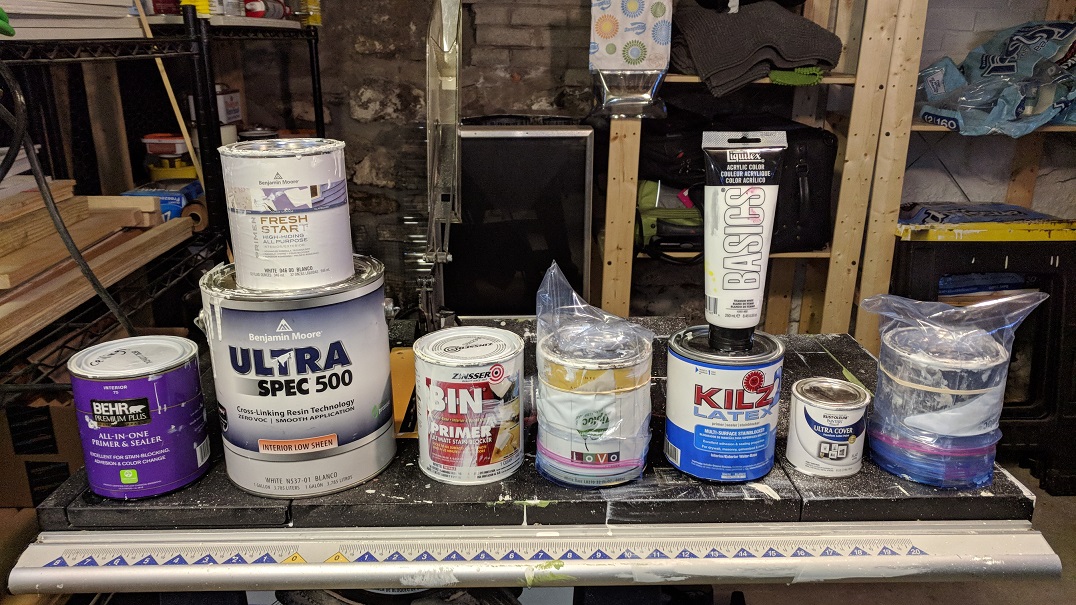
Once that debacle was taken care of, I turned my sights to the ceiling. I needed to paint it where I’d patched the drywall with joint compound. I thought it would be the easiest thing in the world to grab a can of white from the basement and touch up the ceiling. NOT! Here’s where I got to experience 3 hours of hell, alternately known as “9 Shades of White”. NINE!!! We have never had the original paint used on the ceiling, so I’ve never known what brand or hue it is. All I know is it’s flat matte, like most ceilings. I thought I’d find a match in a few minutes. I thought wrong. I ended up having to paint a test splotch of every single white paint we own, including my tube of Liquitex fine art paint! Here are some of the test splotches – as you can see, none are very close:

The only thing I didn’t try was “white-out” [which is what hubby used to touch up paint before he met me – so adorable]. Here’s the criminal lineup:

From left to right:
[1] Behr Premium Plus All-In-One Primer & Sealer – White #75
[2] Benjamin Moore Ultra Spec 500 – Interior Low Sheen – White #N537-01
[3] Benjamin Moore Fresh Start Primer – Base White
[4] Zinsser BIN Primer – Base White
[5] Benjamin Moore White Dove – Eggshell
[6] Kilz Latex Primer – Base White
[7] Liquitex Basics Acrylic – Titanium White
[8] Rustoleum Painter’s Touch Ultra Cover – Flat White
[9] Trim Paint – no idea. As far as I can tell it’s Linen White, Semi-Gloss
The ONLY ONE that matched in color was the Behr Premium Plus All-In-One Primer & Sealer, which I tried second to last:

I bought this on a whim last year at Home Depot. I’ve never even used it [which is why I tried it second to last – after going through the 7 cans/tubes that were open I began trying the ones that were still factory sealed]. Thankfully I bought it!!! The only difference is that it’s eggshell instead of matte. But it’s too small a difference to notice, especially from the floor. O-M-G! Finally. Holy Cow. You might notice from the list that I even tried our primers & exterior paints! Jeesh.
But the wall and ceiling came out awesome:


Except in this photo, which I shared to Instagram. After posting it I noticed the wall looked splotchy up near the ceiling – I’ve included a close up on the right:


You can’t see it when you stand on the floor and look at the wall, but you can see it if you lie on the bed and look up:

GAH!!! The splotchiness extends the entire length of the wall, up near the ceiling. After much thought, I realized what must have happened. As I was painting, I had my ladder extended fully up:

Since the ladder reached almost to the ceiling, I had to roller in and around the ladder legs, and then when I moved the ladder over a few feet, I’d roller where it used to be. BUT I think even though I thought I was doing a thorough job, I wasn’t. So I will have to move the bed away from the wall again this weekend and set the ladder down lower [which is safer, because I can set it up in an A-frame shape] and use my extension roller to re-paint the top part of the wall. Bummer. But at least I [think] I figured it out!
Also, has anyone ever had paint go bad??? Since we won’t be needing the old bedroom wall paint anymore, I opened the can to let it dry out so I can throw it away. I was so horrified to discover a film of mold and nasty smell:

SO GROSS!!! I used it a year ago when patching the bedroom wall and it’s been completely sealed since then [or at least had the appearance of being]. I don’t know what happened.
PS – my legs will be happy when the bedroom wall is done. I call these my ladder legs:

It must be difficult to paint well from such a big ladder. Makes me happy that I hired out our exterior paint job. You impress me with all that you do.
Well, the only times I’ve painted walls (girl cave and now bedroom) have been from a ladder so I guess I don’t know the difference!
YES!! This same thing happened to the BM paint that we used on our kitchen cabinets!! I had never seen mold on paint before. I didn’t even know paint contained ingredients that could mold! This has never happened with my Valspar paint. WTF???
So Crazy!!! SO gross. I wonder what’s in their paint to cause things to grow on it…
Well, as you said ….nothing’s ever easy, especially if you think it’s going to be super easy. However, once you’ve finished the touch ups, your room is going to be beautiful! Actually, it always has been beautiful, so you’re just doing the frosting on the cake.