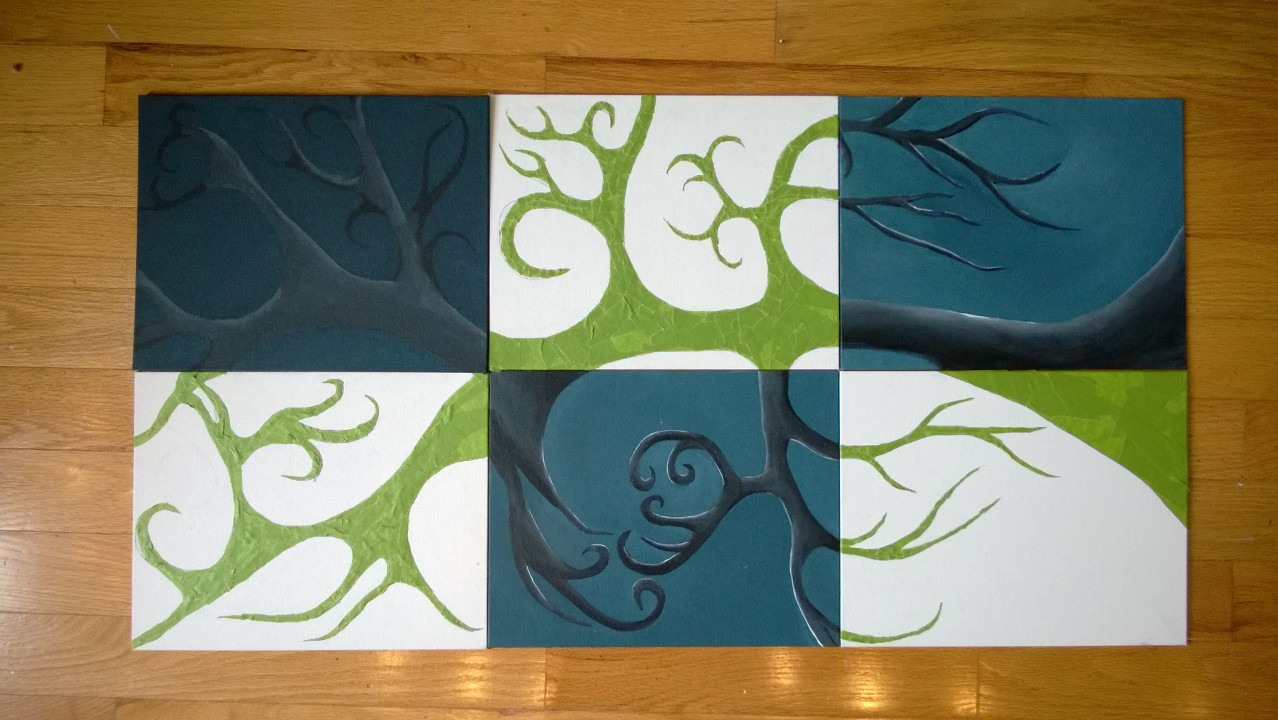
Almost exactly a year ago [how weird is that?] I started working on my 6 panel art/painting project. The project actually began in 2004/2005-ish when I bought the 6 panels of canvas board, laid them out on the floor in my old apartment, and sketched a big tree onto them. The plan was to paint 3 panels dark and 3 panels light so together they make one picture but half day/half night.
To refresh your memory, here’s what they looked like as of July 2015 when I last worked on them, on the LEFT, and what they look like now, on the RIGHT:
Last July [LEFT], this July [RIGHT]:
The green isn’t actually paint, it’s painters tape – more on that in a minute.
For the past year I’ve been trying to decide how best to approach the light side of the piece. My first idea involved cutting the tree out of hardware tin and gluing the pieces to the canvas. But the tin was really hard to cut/work with, really sharp [!], and kept curling. There was no way glue was going to hold it down:
I thought about using tin FOIL, the really heavy duty kitchen stuff, but decided to scratch that idea too. Although I might end up back there if my current plan doesn’t work… Then I briefly toyed with cutting the tree out of glass, spray painting the back of each glass piece chrome, and gluing them to the canvas, but I decided that would be too heavy when hung on the wall. Also, the tree is pretty intricate in places and I don’t think I’m at that level of glass-work yet…
All this trouble is because I don’t want to paint the background of the 3 light panels and lose the outline of my tree, but I also don’t want to paint the tree and then paint the background around it [which is what I did with the dark panels – dark paint is a lot more forgiving than light]. I want to have a way to paint the entire background at once without losing the outlines of the tree. Which is where the painters tape comes in. My current plan involves covering every inch of the tree with painter’s tape, painting the background over the tape, and then peeling the tape off. That should leave unpainted white tree on my 3 light panels. THEN covering the entire background with tape – except for the tree – and spray painting the tree chrome. So we’ll see how that goes… It took me over an hour last night to meticulously cover the tree with tape:
Up close it reminds me of preschool when we covered bottles with small pieces of masking tape and then rubbed shoe polish on them to make them look old [no idea why, but apparently it’s still a thing if you Google it]:
You also might notice in a few places that there’s lines but no tape – I made a few minor adjustments to the branches before taping them. Some are now narrower, some are wider:
The next phase involves painting the background with a big, fat brush. And then removing the tape and praying this idea works…


You are very good at tedious work. I’m a quick and dirty artist — maybe in my case artist is the wrong word. Can’t wait to see yours. Jo @ Let’s Face the Music
I like the tree!
I look forward to see the finished picture.
In sleep I get the best ideas.
Good succeed !
Liebe Grüsse
We are so similar, deine Schwester! 🙂 🙂 🙂
Danke!
Liebe Grüsse
It is impressive how much work you are willing to do to get the exact outcome that you want. I am much too lazy! I think this is going to look great.
A lot of things I do are to keep my brain busy, and this type of thing is a great example! Easy but time consuming. Helps me to have stuff to focus on.
That’s why art pieces are expensive–they are a lot of work!! Good luck!
Very good point!
This a very interesting and very ambitious project – I’ll be curious to watch the ongoing progress. The end product is going to be really beautiful and dramatic – so it will be fun to see how you get there. Have fun!
Thanks! I have spent years thinking about moving forward with this project. Drew the tree in 2004, spent 11 years pondering how to go ahead with it, painted the dark side, and spent another year pondering how best to approach the light side. Most of my art projects spend a lot of time on the back burner. Sometimes I wake up at night (like with this project) and know just what to do next.