
OMG this was a PROJECT!!! One week to dismantle the washer, replace the spider arm, and put the washer back together. Another week to wait for a part we didn’t know needed replacing until we turned on the washer & water sprayed hubby in the chest like a fire hose. But it works perfectly now! I had no intentions to ever dismantle a large appliance, but it was either that or pay $500 for labor/parts and have someone else do it, or pay $900+ for a replacement washer. NOPE! Thanks to YouTube almost anything is possible to do yourself 🙂
We have a Samsung WF350ANP/XAA model washing machine [the 2nd pic is a very old shot from 2014 right after buying the set]:


I was able to Google our model number and find an amazing 45 minute video by AppliancePartsPros.com which I followed to the letter. The model of washer in their video is slightly different than ours, but so close that I was able to figure out the minimal discrepancies by myself. The video even tells you which size socket to use for each bolt, which really helped! Especially since Jim won a brand-new socket set at his secret-Santa at work last year 🙂 :


This project started in early October when I noticed the washing machine was much louder than it used to be. It sounded like galloping horses whenever it was on. Hubby hadn’t noticed because despite being in charge of our laundry, the change was so gradual it was virtually undetectable. I only noticed when it got too loud to ignore. I googled it and the most likely culprit was the spider arm assembly. I’d never heard of that. The spider arm is what allows the drum to rotate/spin. To replace it means literally taking apart the ENTIRE machine. Challenge accepted!
We ordered a new spider arm assembly [#affiliate] from Amazon [$116] prior to me even taking the washer apart, which came with a drum seal and 6 spider bolts:

On October 12th I turned off the water and got started. After removing the back and top covers of the machine, the first step was removing the rotor bolt. That innocent looking thing in the middle:


It was a BITCH!!! After an hour of fighting it, and after hubby had tried, and after I’d emptied half a can of WD40 on it, and after trying to heat it up, and after trying every other suggestion I could find online, I was ready to burst into tears:

I finally found this AMAZING video by Patricia Cravatta, who [in addition to cracking me up with her deadpan humor] helped me realize it was a matter of brute force. She used a mini sledge hammer repeatedly on her socket wrench handle and finally got the bolt off her washer. I don’t have a mini sledge hammer [adds one to Amazon Wish List] but a regular hammer worked fine. I had to slam the hammer on the wrench handle for close to 30 minutes! My whole arm was vibrating. But every so often the bolt would turn a little. Once I got it out I saw why – it was totally rusted on:


WHEW. That was the 2nd hardest step of the entire project. Once the rotor was off I removed the stator:


Then disconnected a bunch of hoses, disconnected the door switch assembly, removed the front of the washer [including the electronics panel and door], & let the drain hose drain into a pan:


In addition to the socket wrench set, I also used a whole assortment of other tools during this project:

Next up was removing the rubber door seal:

Removing the weights from the tub assembly [the black U-shaped things above and below the door opening]:


Disconnecting the 4 shock absorbers that support the drum:


And finally lifting the drum out of the machine [with hubby’s help]:

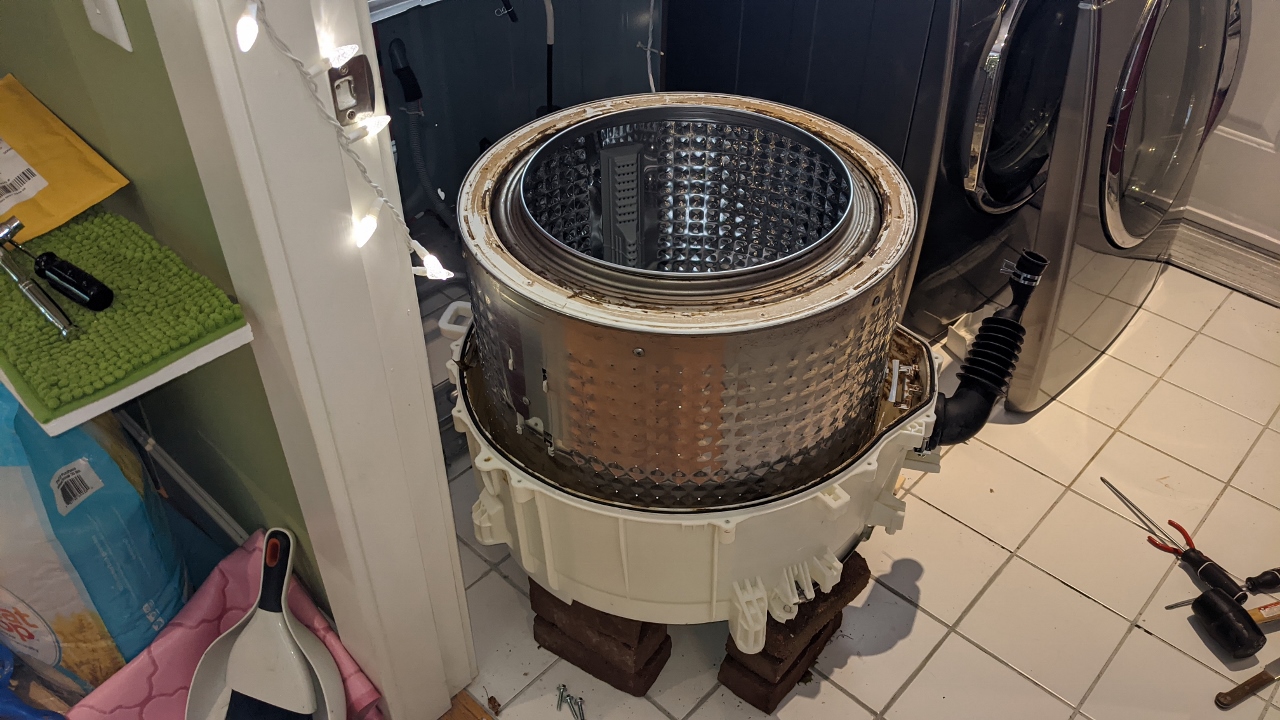
Once the drum was out, I had to support it up on bricks because of the large bolt that protrudes from the back. Then I was able to remove the white drum housing:


And discover how nasty it was inside. The 2nd pic shows the actual spider arm on the back of the drum


It was DISGUSTING. Covered in brown slime and wet, white furry mold. The 2nd pic is the inside of the drum, also disgusting:


The video said that every time you take apart the drum you should ALWAYS replace the drum seal, which is I guess why the spider arm assembly we bought came with a new seal. After thoroughly cleaning the drum, it was easy to install the new seal. Just press it gently into the housing:


The next part was removing the actual spider arm from the metal drum. It was the hardest part of the whole process. By far. The 6 bolts holding the arm to the drum were completely sealed on. Two broke off when hubby used the socket wrench on them [1st pic, left side], and the rest rounded off as we tried to turn them [2nd pic, right side]. NOT HELPFUL!!! I even tried using my Dremel tool to slice into them so we could use a screwdriver or power drill, but that didn’t work either:


Stay tuned for Part 2!